
Is it worth learning to peen?
Yes! Good mowing technique will only get you so far. The key to easy, relaxed and efficient mowing is a really sharp blade.
Here is the low down on peening…
…what it is and why we think it is worth taking a little bit of time to learn. Your efforts will be well rewarded!

The Fundamentals
There are two aspects to maintaining a sharp edge:
- Good technique with a whet stone when honing in the field
- Use of a peening jig or anvil to create a good blade edge profile; capable of holding a sharp edge for a sustained period of time.
Peening is the art of cold hammering the edge of the blade to draw it out and restore the ideal cutting profile.
It is also used to tailor the blade edge to the task in hand (eg ultra-fine for lawns, more robust for mowing weeds) and to repair damage to the blade edge.
Repeated honing alters the profile of the blade edge.
In the field a sharpening stone is used to hone the blade edge, often as frequently as every 5 minutes.
After repeated honing with a stone the blade edge gradually becomes worn back into the thicker metal of the body of the blade. The profile of the edge is altered and it becomes less efficient at cutting. (See this informative diagram by Peter Vido)
The mower has to sharpen more frequently, the blade is not holding an edge so well and mowing is becoming harder work. It’s time to peen the blade!
Peening thins and reshapes the blade edge into a good cutting profile.
As well as reshaping the edge, the process of cold hammering the edge “work-hardens” the metal, meaning it wears more slowly and will hold an edge for longer.
It can be used to tailor the blade edge to the task in hand (eg ultra-fine for lawns, more robust for mowing weeds) and to repair damage to the blade edge
We find new blades reach their peak potential only after several passes over the peening anvil.
Getting to grips with the art of peening is a transformative moment for many mowers.
We remember the time, early on in our scything journey, when we cracked peening. Suddenly, the hay meadows that looked so large and intimidating fell easily before our blades. We were able to mow so much more in a season and mowing became a real pleasure.
The frequency of peening depends on the blade and the work it is being asked to do.

Mowing lawns and meadows require a fine, ultra-sharp edge and so more frequent peening of the blade is necessary (something like after every 4 hours of mowing.)
Less frequent peening is required when mowing rougher grass and weeds. A very fine edge is not required to mow efficiently in these circumstances and would be more vulnerable to damage.
If you are only ever mowing rough vegetation like bracken and brambles you can get away without peening at all. A file and a coarse sharpening stone can be use to reshape the blade edge instead.
Be aware that reshaping like this will wear your blade away over time, as you will not have the peening action pulling more metal forward into the edge. You will also miss out on the work hardening of the edge.
We encourage all new scythers to peen their blades right from the start of their scything journey.

Mow with it for a few hours, then get that jig set up and have a go! It establishes the habit and actually makes things easier in the long run.
It is harder to get a blade-edge profile back to a good shape when it has been heavily used for a long time with out peening.
The blade will be worn back into thick metal and repeated passes are needed to draw the metal of the edge out into a good shape. Each pass hardens the metal, making the subsequent passes that are needed a bit more difficult.
This varies, depending on the amount of peening a blade needs and the experience of the peener.
You will be slower when you are learning and will speed up with practice. With practice you can give a 65cm blade a full jig peen in less then half an hour.
If all that is needed is a quick retouch of the edge, this can be done in a few minutes by an experienced peener.

How to Peen
There two main ways to peen a blade:
- Using a peening jig
- Freehand peening with a peening anvil and hammer.
Details on both methods of peening can be found below.

Which ever method you choose you will need to mount your anvil or jig in some way. This can be as simple as a fixing it into a large block of wood, which you sit next to on a stool whilst peening.
We use a simple “peening pony” in which a seat is incorporated into the jig / anvil mounting block. Your weight on the peening pony helps prevent movement caused by the hammer blows. You can tailor the height of the bench to suit your leg length, making supporting the blade with your knees during peening easy and comfortable.
Here are instructions on how to make a simple peening pony.

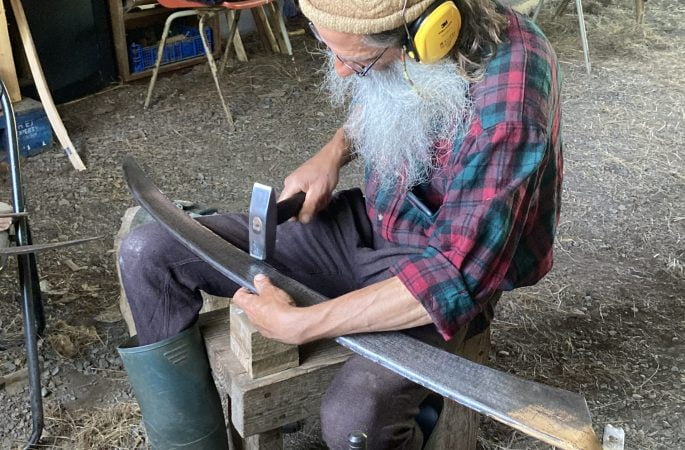
The Peening Jig
The Peening Jig makes the art of peening more accessible to the beginner.
 The jig is relatively easy to use and requires less accuracy then freehand peening. It produces good results for most circumstances, and can produce excellent results with practice.
The blade is placed between the first cap and the base of the jig. The cap is struck repeatedly with a hammer as the blade is drawn through the jig producing a line of blows near the blade edge that draws out and thins the metal.
The process is repeated with the second cap, which is shaped so as to create a line of peening closer to the blade edge then the first.
Phil started peening with a jig and we recommend most people to do the same.
- The book Learn to Scythe contains instructions on using a jig.
- We cover basic jig peening during our Introductory Scythe Course.
- We look at all aspects of peening in detail on Peening and Sharpening Workshops.
- This YouTube video by Neil Dudman is a good introduction.
With a peening jig, a standard hammer about 1lb / 500g in weight can be used. The condition of the face is unimportant as it does not come into contact with the blade edge.

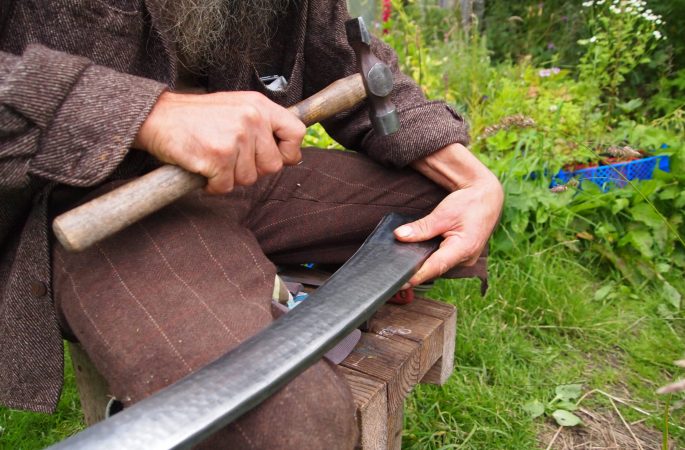
Freehand Peening
The method of free hand peening seen most frequently in the UK uses a bar peen anvil and a flat hammer.
- The flat hammer is used to hammer a line a few millimetres back from the blade edge, drawing the metal forward and thinning it.
- The process is then repeated a number of times, the exact number depending on the thinness and sharpness of the edge required.
- Each time the hammered line is placed closer to the blade edge, with the final line being on the blade edge.
It takes practice to master the accuracy of the placement of the hammer blows.
Once this has been achieved, free hand peening can produce even better results then the jig.
You can learn more about freehand peening:
- on a Peening and Sharpening Workshop
- on the Scythe Masterclass, or
- from the videos of Phil’s Peening Masterclass at the Scythe Festival in 2011 (links at the end of this guide).
Below is a video of Phil freehand peening a scythe blade. Note the ear defenders.
Peening produces a high pitched, percussive noise. Whilst it is the distinctive sound of the scything season, it could damage your hearing if you are exposed to it a lot. Phil peens over a hundred blades in a season so ear protection is prudent!
 With a peening jig, a standard hammer about 1lb / 500g in weight can be used. The condition of the face is unimportant as it does not come into contact with the blade edge.
Peening with an anvil requires a more specialised hammer. The face of peening hammers must be kept smooth and shiny. Any dint or defect in the face of the hammer will be imprinted in the blade being peened.
A peening hammer should be reserved for peening with an anvil only and NEVER used with the jig, or worse yet, to hammer in nails!
We supply peening hammers or you may find a suitable hammer that can be polished up for use in your collection or at a second hand tool sale
Peening with a jig is a great way to familiarize yourself with the process, and it lessens the chance you will damage your blade as you learn.
If you want to move onto freehand peening, a good intermediate step is to use the jig to complete the first lines of peening, then finish the edge freehand.
This is the easiest line to place freehand. Practicing in this way will help you build the skills and confidence to complete the whole task on an anvil.
Here is a guide to choosing between anvil and jig peening
Videos of Jig Peening
Videos of Phil’s Masterclass on Freehand Peening (2011)
More Information

Thank you – very good and useful tutorial. I’m out to sharpen right now.